
Workflow
Workflow – this is a description of the process by which images get from the card in your camera onto your computer, are assessed, edited and categorised appropriately for their purpose. Now there is no right or wrong answer to the steps in this process, what works for me might not work for you, but I’ll explain what I do and more importantly why I do it. I have automated some steps to help speed up the process. I’ll explain the steps where I have made mistakes at times and what I have done to mitigate the chances of them happening again!

Maintain the integrity of the image data during the process – what I mean here is basically dont loose any images – it is easy to make a mistake and loose images if you are not careful, if not immediately, you can set things in motion to loose them later!
Minimise the amount of work I have to do and to make sure I spend time appropriately and not waste time on images that add no value (ie are badly composed, out of focus, technically poor, etc.). If things can be automated then that is the ideal solution !
Add enough ‘Metadata‘ to the images so I can easily identify them in the future by a combination of star rating, colour rating, keywording, etc. Modern tools have very powerful search functionality built in, but can only work if there is metadata to search on.
The Workflow Process can be simply divided into three actual physical phases:
Physically transfer the files from camera to computer and make additional copies for security purposes.
Categorise images for quality and subject – so we know which images to process further and ensure we can find them again in the future, there is nothing worse than knowing you’ve got a great picture that you cannot easily find.
Edit the images to achieve the desired end product, this will vary depending on whether you are producing a print, an image for the web or just email a copy to a friend.
Simple hey!! Now let’s look at each of those three phases in turn and I’ll explain a bit of the logic behind my choices, then you can make your own decision as to which way you want to proceed based on your OWN personal requirements. If it’s right for you then it’s right, it doesn’t matter what anybody else thinks.
Perhaps the simplest of the three phases but one that can make your life easier or harder later on and also reduce the chance of loosing files. It also encompasses some techniques and conventions that will certainly make your life easier and I believe it’s worth the time in going back and converting your earlier work to the same standard to aid consistency and transparency. In this stage I also include getting the images into your Digital Asset Management (DAM) program of your choice. I use Adobe Lightroom (www.adobe.com/lightroom) as my DAM but there are many others available.
The DAM system allows you to view and organise your images to make the following steps easier to do. It gives you the framework in which to work, providing the ability to sort and filter your images for viewing.
The image below shows a schematic overview of the import process that I use. Now, firstly I must admit that this is a little more complicated than the most simple process you could use as I use two applications to get my images onto my image storage device for the purpose of speed! I use an application called “Photo Mechanic” by a company called Camera Bits (www.camerabits.com) to speed up the import process, you could just use Lightroom (or your DAM of choice) and simplify the process. Photo Mechanic was developed for photo journalists that have to get their images from the camera to the photo editor at the news desk as quickly as possible.

Let me explain the steps in the process:
- Images (taken by the camera) are stored on a removable card inside the camera. Typically you can connect your camera directly to your computer via a cable, but usually the fastest was is to remove the card and insert the card into a card reader that is attached to your computer, generally this uses faster protocols to transmit the files.
- Insert the card into you card reader and it will be detected by your computer and recognised as an external data device. I have automated the process on my Mac computer so when I insert a memory card into my reader it automatically opens my import application on my computer. This saves time and keystrokes meaning less chance of making an error.
- I then use Photo Mechanic to import (and star rate - more of this in the next section) my images. Photo Mechanic presents an ingest image dialog box with the destination folder pre populated. The destination folder is the location on your storage device (either your computer or an external disk drive attached to your computer) where the images will be copied to (item 4 in the above diagram). Photo mechanic has the following advantages:
Allows you to import files to two locations so you can create an instant backup of your images.
Allows you to define how you want to name your import folder name, I’ll explain below the scheme I use and why.
Allows you to rename files as they are imported, I don’t do this as I keep the name given in the camera.
Allows you to apply an IPTC template to the files. The International Press Telecommunications Council (IPTC) defines a standard set of metadata attributes. This means you can add your name, address, copyright information and a whole host of other information into you image files automatically.
Set up default criteria such as a such as a ★★☆☆☆ default rating for all the images, this saves time in that as you will see from the charts below the vast majority of images remain as ★★☆☆☆ so you are saving time in so much as you only have to change the remaining images up or down a rating.
Allows automatic unmounting of your card once the import has been completed.
Is extremely fast in operation so it removes the frustration of other programs that are ‘sluggish’ on import.
Once you press the ingest button Photo Mechanic opens a contact sheet dialog where it shows a thumbnail image of each image as the are rapidly copied to you computer. It is important to realise that images are copied to your destination folder (4) and that’s where they remain for the rest of this workflow so its important to name the directly where they go logically.
yyyy = year eg: 2020
mm = month eg: 01
dd = day eg: 19
descriptive name = something that defines what the images cover and will make sense to you later eg: “wild otters”
Naming directories in this way means they will be arranged chronologically on your computer and are therefore easier to locate. To make things more manageable each directory is placed in a parent directory for the year so the structure would look something like:
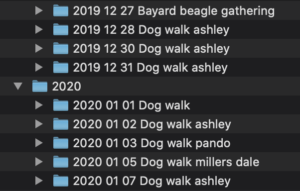
As soon as Photo mechanic starts to ingest (their word for import) the images you can click on the first image and see a full size preview of the image, you can the go through the images quickly rating each one by either pressing a number key to increase or decrease the star rating eg 3= ★★★☆☆ or by pressing the ➜ key to move to the next image and leave the rating unchanged as ★★☆☆☆. This way you can quickly rate all your images, they can be changed at anytime should you wish. At this time I also colour code any special images, such as Panoramic or HDR images with colour flags to identify them later.
That’s it the images are now on my storage disk (and a secondary disk if you choose to do that on import too) so at this stage I now have potentially 3 copies of my images, two on hard disk drives and one set still on my camera card. I will not reformat my camera memory cards until I have at least two copies elsewhere.
That’s not the end of this part of the process though as I now need to get the images into my Lightroom (DAM) catalog. Once they are on the computer storage disk they can be added to the Lightroom Catalog which lives on my computer (labelled 6 in the above diagram). Lightroom (labelled 5) allows you to do several things on import, these are:
LMove (or Copy) the images to a new location and add the to the Lightroom Catalog – we don’t need to do this as we have already moved the with Photo Mechanic, but if you are not using Photo Mechanic you would use this to move them from you Camera card to you Computer Storage Disk and add them to the Catalog.
Add the images to the Lightroom Catalog leaving them in their current location. This is what we use as we have already moved them with Photo mechanic. One really important note here, if you use Lightroom to import your images and you use this option the images will be added to your Catalog BUT WILL STILL REMAIN ONLY ONE YOUR MEMORY CARD, so if you then reformat your card you will loose everything but the preview that Lightroom generated, be warned this is easily done. Always check you are copying the images onto your computer or external drive if you use this option. This is especially easy to do if you swap between programs for your importing.
It is important to realise that in Lightroom your images are NOT HELD IN THE CATALOG, just a reference to where they are. The Lightroom Catalog is essentially a database containing pointer and links to the actual files. This means that all the order and structure you create when setting up the directory structure I suggest above will allow you to use other applications in the future should you wish to change, by importing that structure into your new application. Lightroom also lets you apply presets or add IPTC information is a similar way to Photo Mechanic as described above.
This is not intended to be a tutorial on Lightroom, as I explained earlier there are plenty of tutorials and videos freely available, but I wanted to explain how I use the tools and why I do what I do.
Ok, your files are now safely on the computer (or external storage device) and imported into the Lightroom Catalog so you can unleash its power to help you with the next stage, categorising your images.
I use a star system for this task. Most Digital Asset Management (DAM) systems such as Adobe Lightroom allow you to do this. As I explained in the above section I even do it ‘on import’ so as soon as my images are on my storage disk they are categorised. I star rate on a zero to 5 star system that uses the following Schema (or description of what each star rating means). An images can always be upgraded or downgraded at any time, maybe I was a little enthusiastic when I rated them because I was still excited about the shoot, in the cold light of day sometime later they may go down a rating. Images may grow on me later too and go up a rating!
The star rating step is the first stage of the categorisation of the images. I Star rate all photos using the schema:
0 ☆☆☆☆☆
Not yet rated – meaning I’ve not yet looked at this image and it needs to be rated. This should represent zero images in your library assuming you are up to data with processing.
1 ★☆☆☆☆
Keep but disregard – simple meaning don’t look at this again! I don’t delete anything ever! But this is as close as I come. In my Library, this represents 1.3% of my images.
2 ★★☆☆☆
Show when looking at shoot. This is my default rating I give everything I import to show its been through the process, and I up or down rate it from here as needed. This means it will be visible if I look at my photos but I will not do any further processing on this image. It is there in case I want to go back to it but not worth spending any time on. In my Library, this represents 82.6% of my images.
3 ★★★☆☆
Recommend as best from shoot, edit these as necessary. 3 Stars and above get edited and further assessed. In my Library, this represents 15.2% of my images. Meaning when combined with 4 and 5 star images that I actually edit about 16.1% of my images. This will vary depending on the type of photography that you do, if you are a Landscape photographer who takes a lot of time setting up each image then I would expect this value to be higher. Especially where you take images of action subjects there are going to be a number of images where things just don’t drop into place, legs in the wrong position, eyes closed, ball not in the ideal place, etc. so the percentage of shots you want to take to the next stage will be lower.
4 ★★★★☆
Specials from shoot, These images are special in some way, I’m pretty pleased with them! In my Library, this represents 0.9% of my images.
5 ★★★★★
Hero image, theses images are amongst the best images I’ve ever shot. In my Library, this represents 0.1% of my images.
The chart below gives a visual indication as to the percentages of images in each of the star rated categories in my library.
Anything coloured green will be edited, anything coloured orange will not be.
0 ☆☆☆☆☆
1 ★☆☆☆☆
2 ★★☆☆☆
3 ★★★☆☆
4 ★★★★☆
5 ★★★★★
As well as the star rating a colour flag rating is used to signify other attributes, it is handy to keep these two ratings separate because they signify different things. Whereas star rating is an indication as to quality/suitability, the colour rating signifies a functional aspect.
The colour rating can be added at a number of times during the image classification and editing processes. I use the following colour flags in Lightroom:
- Blue Flagged - Signifies this image has been edited, obviously added after an image is edited
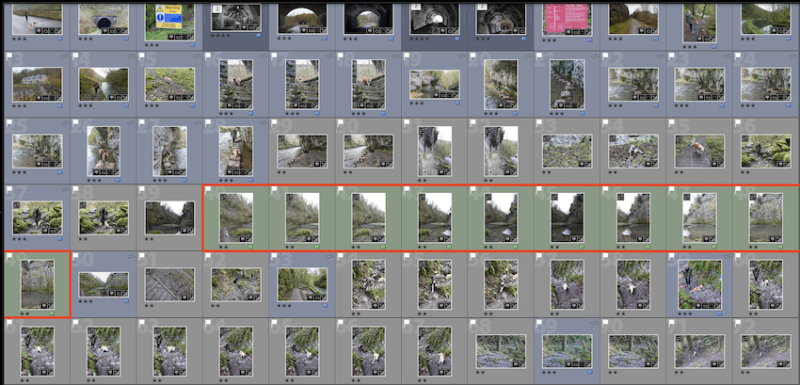
- Green Flagged - Signifies this image is part of a panorama or HDR sequence. This colour flag is added during the initial assessment of the images when they are given the star rating. this flag gives a quick visual identification as the the images to process, so when looking at images in the Library would look like this (I've added red highlighting).
- Yellow Flagged - An alternative to the green flag, it means the same and is used where I have to sets of similarly classified images (for example two sets of Panoramic images) next to each other to show where one stops and the next begins, by alternating green and yellow.
- Red Flagged - This image has a special purpose where I quickly need to be able to identify and flag some images, maybe to send for printing etc. It acts as a quick and easy flagging system so I don't have to add additional keywords or text.
- Purple Flagged - This image has a special purpose where I quickly need to be able to identify and flag some images, maybe to send for printing etc. It acts as a quick and easy flagging system so I don't have to add additional keywords or text.
So you have now identified which images you like, which images are worthy of you time to edit and process further. As part of the review process you will have looked at each image and you may change your mind about some of the earlier images once you have viewed the later ones, don’t worry this is normal. Always remember your view is subjective, one day you may be in the mood to like an image and the next you may not.
The next stage in categorising your images is to add more information to them so you can search for them and it will make your life easier in the future. One way of doing this is to add Keywords to the images, these keywords are written either into the image file or into a ‘sidecar file’ that is associated with the image so they travel with your image wherever it goes. if you spend some time now rather than having to come back and revisit them to add keywords later.
Keywording is an art in itself and only practice can speed up the process, it’s not a pleasant task but take joy from the fact next time you want an image of a ‘bar Owl’ you can type it into you search criteria in Lightroom and find all your ‘Barn Owl’ pictures… How good would that be!!! Again there is plenty of information about Keywording available but you have to do what suits you. Don’t go ‘overboard’ or you’ll get sick of it and give up.
Some simple tips are:
List the contents of the image – Firstly I pretend I’m describing the picture to a blind man or stranger who knows nothing about anything. So for an image of a Sandstone Arch Landscape feature, I don’t start off by adding keywords like “Landscape Arch” which mean nothing to my hypothetical stranger. I’ll add words like “arch”, “desert”, “sand”, “red rock”, etc.
What does the picture mean? – Second, I try to add abstract or adjectival terms – eg isolation, remoteness, geology, erosion, sculptural, solidity, resistance.
What do I know about the picture? – Only then will I add the easy words, information that I actually know about the image’s contents – Delicate Arch, Utah etc.
Now you are ready for the next step, where your images come to life and you can unleash the inner creative beast!
Now as you have probably seen there are countless tutorials and blogs on the Internet about image editing, I certainly don’t claim to be an expert on the subject and enjoy reading articles from proper seasoned experts like Andy Astbury (https://wildlifeinpixels.net/) or Guy Gowan (https://www.guygowan.com/). But be prepared to get your brain cells working if you get into the sort of detail these guys go into.
If you shoot you camera in RAW (and you should for a whole lot of reasons) and not JPEG, then when you first look at your images they will look a little flat and dull, not as good as they did on the back of the camera hey? Well that’s because within the RAW file there is a small JPEG version that has had lots of adjustments applied to it which your camera displays on the screen on the back. A RAW image needs work to get it’s potential to show.
I am not going to go into the detailed theory about editing as its done much better than I could do elsewhere but I use Lightroom for the majority of my basic editing and ’round trip’ files to Photoshop for more detailed corrections such as removing dogs leads from the image of extending the image size if things get a bit close to the edge of the frame. The beauty of the Adobe products is that they seamlessly integrate with each other so I can send a file to Photoshop from Lightroom and when I save and close it in Photoshop then it’s magically back in Lightroom with all the edits done.
In the section above I described how I categorise my images and now that is done I can select my images for editing, I only edit images that are rated ★★★☆☆ or above. The first thing I do when I have opened Lightroom and selected the folder I wish to edit is to set a filter to show me only these images.

Then if I have any Panoramic or HDR image sets in the shoot I will combine the images into the final Panorama or HDR file and downgrade the component images to ★★☆☆☆ so they disappear from my filtered selection. As they are still colour flagged (either Green or Yellow, as described above) I can easily find them again if I need to recreate the final image.
Ok, we now have a set of images to edit, I find it helps if you have a set routine you use to process an image, some things are better done in a certain order, other do not matter but having a routine means you tend to be more productive. Obviously some images will break this model and require processing outside this norm.
First I like to crop my image and straighten it if for some reason you have not got your horizons level, no real excuse if you have been using a tripod but sometime composing a shot will be rushed and you may be a little wonky!
Cropping an image can completely change the look and feel of the image and there is a lot written about so called ‘rules’ that should be followed. As always with rules, these are just guides to help you think about things, they are not set in stone and if you want to break them, or just bend then a bit, then go ahead. It’s your image in the end and do what makes you happy.
Now I have the image proportioned correctly and the amount of sky or area of shadow is fixed so that you can see what you have to work with (and possibly correct) in the image.
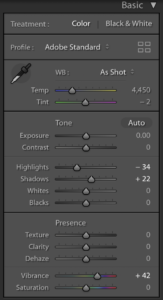
So next I check and adjust the white balance as needed and then address the overall exposure and the exposure of highlights and shadows in the image along with the contrast.
Next I will adjust the saturation / vibrancy and add any texture / clarity that is required. Subjects like black dogs always seem to benefit from adding some clarity / texture to make their coats ‘pop’.
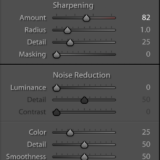
Finally I will add sharpening and noise reduction as required depending on how the image is going to be used (web, printed, etc).
Once the initial pass is done you may wish to go back to any of the sections and re-adjust any of the adjustments or even take the image into Photoshop is there are any detailed cloning or adjustments to be made. The most common uses of Photoshop that I have are to clone areas of the image (removing dog leads, telephone wires, etc.), adding extra ‘canvas’ to a side of the image to make things better proportioned, if I didn’t give myself enough room whilst taking the image.
Once this is done I may re-rate the image either up or down and then finally flag it with a ‘Blue’ label to signify it has been edited.
If you take anything away from this article at least remember the following key points:
